

Image exposure is primarily controlled by three major factors: aperture, shutter speed, and ISO. Creating meaningful imagery begins with a solid understanding of the interplay between these factors.
This 3 part series on exposure will explore aperture, shutter speed, and ISO from a basic fundamental viewpoint as well as some of the more advanced concepts applicable to each factor.
Aperture Basics
In my opinion, aperture is the most important of the three factors. Aperture strongly influences focus, has an enormous influence on the look of the final image, and often dictates the expense of high quality glass. These are a few of the myriad reasons why aperture is so important, and why we must understand aperture to create outstanding images.
First, we must define some nomenclature so you know what the heck I’m talking about. The term “aperture” refers to the physical size of the opening in your lens that allows light to hit your sensor.
Large aperture = big hole = lots of light
Small aperture = small hole = not much light
The term “f-stop” is controlled by the aperture and each f-stop setting on your camera correlates to a specific aperture. F-stop is the actual parameter that you can adjust on your camera. F-stop is a number.
Small f-stop (f/1.2) = large aperture = big hole = lots of light
Large f-stop (f/16) = small aperture = small hole = not much light
Yes, in either case we are referring to the size of the hole in the lens, but it is important to make this distinction between a physical size (aperture) and a parameter on your camera that refers to that physical size (f-stop).

Depth of Field:
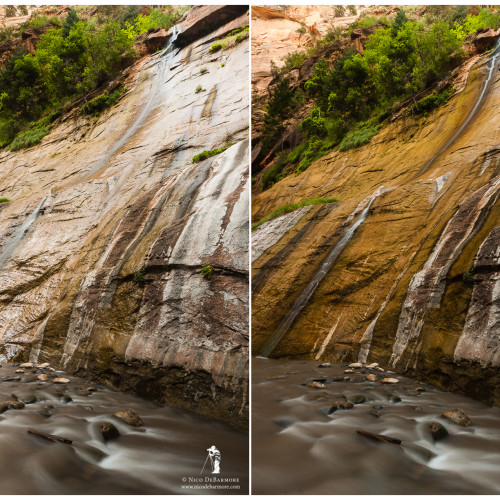
Depth of field (DoF) is the slice of your image that is in focus. This slice changes in thickness as the aperture changes. A large aperture yields a small (thin) DoF. A small aperture yields a large (thick) DoF. Have a gander at these two images to the right…
The first image has an f-stop of f/2.8. This creates a narrow depth of field and the only slice of the image in focus is the man and the building in the foreground. The second image has an f-stop of f/8 and the blue buildings in the background are more focused than they were in the first image. This is because at f/8 the depth of field has increased and expanded beyond our foreground towards the background.
When you adjust the focus ring on your lens, you are moving your slice of focus farther away from or closer to yourself. When you change your aperture, your depth of field changes and your slice of focus grows or contracts.
Exposure:
Remember that we are ultimately talking about the factors that affect exposure. Aperture affects exposure by increased the amount of light that can reach your sensor. By changing to a larger aperture (remember that’s a small f-stop number), you allow more light to hit your camera sensor and thus your exposure is brighter if all other factors are held constant.
Aperture Priority:
You’re camera has a mode dial with several worthy modes of shooting, including Aperture Priority (Av), Shutter Priority (Tv), Manual (M), and Bulb (B). These modes vary what the user selects and what the camera selects for an exposure. Aperture priority allows you to select an aperture and the camera will determine the shutter speed needed for a correct exposure. Shutter priority is the opposite – select a shutter speed and the camera determines the aperture needed for a correct exposure. Manual allows you to set both aperture and shutter speed. In bulb, you set the aperture and the shutter opens on the first press of the shutter release button, and closes on a second press of the shutter release button. This is a more advanced mode and is generally reserved for long exposures. More on that later.
Most of your time should be spent in Aperture Priority (Av) mode. Your aperture has such a large impact on your images because it directly affects the focus of your images. Why is that so important? Because often to have an outstanding image you’ve got to nail the focus. Whether that means you carefully focus on a specific feature of your subject when shooting at small apertures, or you set your aperture to f/8 to increase the amount of your image that is sharp and give yourself room for error, it is the aperture that you are changing when making these important decisions. More often than not, it is best to control your focus and thus your aperture directly, and control your other parameters indirectly.
Once I’ve covered aperture, shutter speed, and ISO I’ll explain this a little more.
Bokeh:
 Bokeh is one of those things that will change the way you look at photographs in the future. Bokeh refers to the nature of the areas of an image that are out of focus. Does the blurred, out-of-focus area of the image have a pleasing quality? Maybe this sounds crazy, but it’s not. The quality of your out-of-focus background splotches is important! Bokeh is the way your lens renders the out-of-focus points of light that are outside of the DoF. So how can bokeh be good, or bad? Bokeh is bad when it distracts the viewer from the subject of the image. Bokeh often becomes distracting by taking on irregular shapes – the ideal shape for an out-of-focus point of light is a circle. However, the changing aperture in our lenses is made by a series of contracting or expanding blades that create a polygonal hole rather than a perfect circle. For apertures smaller than the maximum aperture the blades in the lens contract to decrease the size of the aperture and create a polygon. Have a look at these next two images and you should be able to tell which has better bokeh.
When it comes to bokeh, as with many things in life, you get what you pay for. Higher quality lenses often have better bokeh because they have more aperture diaphragm blades and have higher quality engineering to minimize factors like spherical abberations. Bokeh is most important for portraits, sports, and the like. Any type of photography where the subject is sharp and the background is very out of focus will find bokeh to be important.
Bokeh is a concept native only to the lexicon of photo/videographers. Now you may go forth and bedazzle your friends and family by pointing approvingly at the out of focus, background area of an image and mumbling something about pleasing bokeh and lens diaphragm elements.
Aperture and Focal Length:
To make things even more complicated, the effects of aperture change at different focal lengths. For a short focal length (16mm), DoF is very large (thick) even at small f-stops. This is great, because it means it is easy to get all of a landscape to be in sharp focus. Longer focal lengths (e.g. 200mm) have a thinner DoF, creating a sharp foreground subject and a very blurred background subject, especially at small f-stops. This is why lenses like the 85mm f/1.2 are fantastic for portraits – at f/1.2 the lens creates a very pleasing bokeh on the background but keeps your subject tack sharp.
Scenarios:
I’m going to take you through a couple simple scenarios and explain my thoughts about aperture related to the scenario. I’ll be referring to other factors of exposure, like shutter speed and ISO. Don’t worry if they don’t make sense quite yet – there will be articles on those as well.
Sports – or anything moving fast for that matter. We know we want to freeze motion and show the athlete frozen in time. I know that I will need a short shutter speed to freeze the motion, which means I need to get more light from somewhere else. I can balance the exposure by increasing my aperture to make up for the loss of light of the short shutter speed. I open my lens up to f/4 or even f/2.8 to allow lots of light for a fast shutter speed. What am I trading off? My DoF becomes much thinner, especially because I am using a telephoto lens. If my subject is moving erratically towards or away from me, focusing becomes more difficult. A benefit is that because I have a thin DoF, when my focus is sharp, they will be separated nicely from the blurry background.
Landscapes – my objective when photographing landscapes is to make sure everything is in focus, from the boulder that is right in front of me to the mountains in the distant background. To do this I need a very thick DoF. Thus, I need to choose a small aperture (large f-stop). This creates a smaller hole and lets less light into my lens, which means I need to balance the exposure by increasing my shutter speed. For landscapes, I often choose a f/11. If it is dawn or dusk, it is likely that the shutter speed required to get a proper exposure is longer than I would be able to steadily hold my camera. This is why I use a tripod when photographing landscapes.
Portraits – this is similar to sports, in that we often want a very sharp subject and a very blurry background to make that subject pop. The difference is that in sports we are worried about freezing the subjects motion and in portraits we are concerned only with creating the nice blurry background look. I simply choose a small f-stop (f/1.2 or f/2.8) and use a 50mm, 85mm, or 135mm+ lens to create a pleasing separation between the subject and background and a beautiful, buttery smooth bokeh.
Street – this is sort of like portraits, but often more of the environment is in the photo, and we often want more of the image to be sharp. A common technique is to set a 35mm or 50mm lens to f/8 and with a little knowledge of hyperfocal distance (advanced concept), I can make sure that everything in the frame is in focus without even having to focus my lens for each image.

Leave a reply