
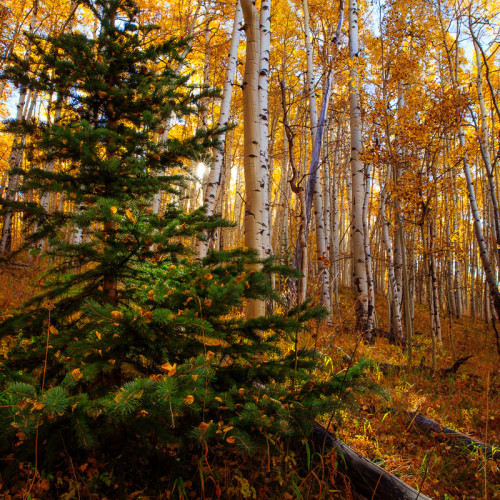
I’ve finally gotten a chance to get to some images I shot a couple weeks ago in Clifton Gorge State Nature Preserve. The Clifton Gorge and John Bryan State Park areas are by far the best place to go for a nice walk near Dayton, OH. The trail makes a loop between the two parks and takes the hiker over a couple of bridges and board walks as it snakes around the Little Miami River. While other parts of the Dayton area have lost most of their color, Clifton Gorge managed to hang on to the bright oranges and yellows that make autumn seem like autumn. I want to provide some advice for capturing the fleeting fall colors that can often make an otherwise mediocre image pop.

Scout the Location
These images from Clifton Gorge are actually the product of two trips to the area. A week before the day of the shoot, I went to the park on a beautiful day with nothing more than the clothes on my back. No camera, save my iPhone. I was scouting locations, envisioning light and predicting sun locations to determine the most promising locations to plant my tripod when I return with all my gear. Without a backpack full of gear to worry about, I am light on my feet and have plenty of energy. I walk the trail slowly and try to take in every detail and when I think I’ve found a promising location I make a quick note of my find by snapping a shot with my phone. The phone photos give me a quick reminder later on when I am planning my shoot and also serve as a chronological list to help me remember what location was where along the trail.
This approach keeps a photographer from spending loads of time photographing locations that don’t produce great pictures. By scouting favorable locations, we can make our precious time count when the light is just right. This approach highlights another important factor for making meaningful images – we often do not get our best image on our first visit to a location because we cannot see the subtleties of the land around us due to the uniquity of every feature in the area. Great images often are a product of great light, and often a great image is made when a photographer who is familiar with a location is able to return under more favorable conditions, such as a dramatic breaking storm, to capture the best shot possible.
So if you can, get out there and look around before you shoot and photos.
Find Dramatic Lighting
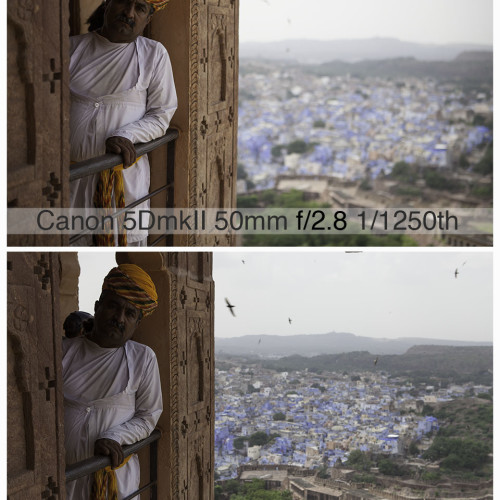
When it comes to fall color, best lighting often happens when the leaves are side-lit or back-lit. When the sun is behind you shining on those leaves, it leaves them a little flat – but if the sun is to your side or directly in front of you, it lights those suckers up like a campfire and gives you those saturated bright yellows, oranges, and reds. The image below shows the exact same scene under two different lighting conditions. Notice how the leaves take on a different character?

The trick to using side and backlighting not catching an unfavorable sun flare in your lens. A lens shade can help if the sun is to your side. If the sun is directly in front of you, try positioning it behind dense foliage or a tree trunk to prevent a distracting flare. But don’t forget – sometimes a sun flare looks good!

Time of Day
Time of day is important. It’s huge. It’s everything. Rarely do I photograph at noon on a sunny day. Overhead direct sunlight is harsh, with deep shadows that cast interesting detail into darkness. Photographers are known for waking up before sunrise, and sticking around until the sun goes down. Around dawn and dusk the light around you will change from blues to reds and oranges to more neutral daylight qualities. The light start very soft and diffuse at dawn (think “no shadows”), gradually growing in harshness as the sun rises. The low angles of the sun and variations in color provide the interesting light we need to make compelling imagery. So get your butt up early and make some photos – as a bonus, you might find yourself to be the only one around at that hour. At noon, you can go make some lunch and take a nap.
Wet is Good
Shooting in the rain isn’t usually fun. But shooting AFTER a rain makes for fantastic photos. After a rain, all those leaves and rocks and moss glisten, and little water droplets cover the landscape to add even more interesting details to your image. But the best part about shooting after a rain is what it does for your polarizer…
Use a Polarizer!
Let’s talk polarizers not in the context of a blue sky or water, but rather in a much less known application. When things are wet – leaves, rocks, trees…anything….they glisten. That glistening is from the reflection of light on the surface of the little bit of water that is on that leaf. That glaring highlight makes that leaf glisten, and it also hides the true color of the leaf by masking it with a subtle reflection of light.
Polarizers fundamentally are glare reducers. They cut the glare, whether it is from water droplets in the sky or on a rainbow, a river, or in our case, those gorgeous colorful, wet autumn leaves. As you rotate the polarizer, notice the saturation peak in the foliage, and notice how the true color of your subjects are revealed. Here is an example on the right. If you are curious, the Singh-Ray LB ColorCombo is my polarizer of choice.

Get the Shot
If you want to get an image different from the one that every other photographer on that trail, you need to do something different. Change perspective – get low, get high. Change lenses – wide, or telephoto? Most importantly, get out of your car, and get off of the trail. Do some hiking and leg work to find a unique composition to cast a new light on a well-known location and you’ll have yourself a keeper. On the right you can see my tripod setup that allowed me to photograph the photo below – far from ordinary!

If you enjoyed this images, have a look at the rest of the photos from the shoot here, or take a look at my work with the aspens in Colorado here.
Also, if you have any questions regarding fall photography or even any other photography topics, post a comment or send me an email. Who knows, maybe your topic can be my next post.
Leave a reply